MIMIC® Online Documentation
ESXi Simulation
- Table of Contents
- Overview
- Prerequisites
- SYSLOG
- WEB Services
- PROXY Server
-
Use File->Terminate to stop the any running MIMIC daemon.
-
Copy the WEB, PROXY, and SYSLOG shared libraries (web.dll, proxy.dll, and syslog.dll on Windows, web.so, proxy.so, and syslog.dll on Unix)
from "bin/dynamic/optional" to "bin/dynamic" in the
install directory.
-
Install the license keys, both WEB and PROXY, as detailed in the instructions e-mailed to you.
-
Restart MIMIC.
You should see the following type of message in the MIMICLog that
confirms that the MQTT module was properly loaded :
INFO  - WEB : Loaded protocol from < path-to-DLL >
INFO  - WEB v16.00
INFO  - PROXY : Loaded protocol from < path-to-DLL >
INFO  - PROXY v16.00
INFO  - SYSLOG : Loaded protocol from < path-to-DLL >
INFO  - SYSLOG v16.00
-
In MimicView, click File->New , then Wizard->Update , and select WEB Services->ESXI to install the library package.
-
Add the real ESXi under evaluation license to vCenter, which will cause
vCenter to fetch one-time proprietary data from real ESXi. This will
avoid licensing issues of full licensing traffic through simulated ESXi.
- (Optional) Remove the real ESXi from vCenter and destroy the real ESXi
- Usage
-
Select agent 1 and change its IP address, if necessary.
-
In PROXY tab of Agent->Configure dialog, set the
Target to your real ESXi's IP address
-
In SYSLOG tab, set the Server to your vCenter's IP address
-
Start agent 1 using the Agent->Start menu item.
-
The first 4 videos at
our videos page
show sample usage of this simulation.
-
Use MIMICView Edit->Copy and Edit->Paste to duplicate
agents.
-
To modify simulation, use Wizard->WEB and select
Change WEB configuration value of the selected agent.
-
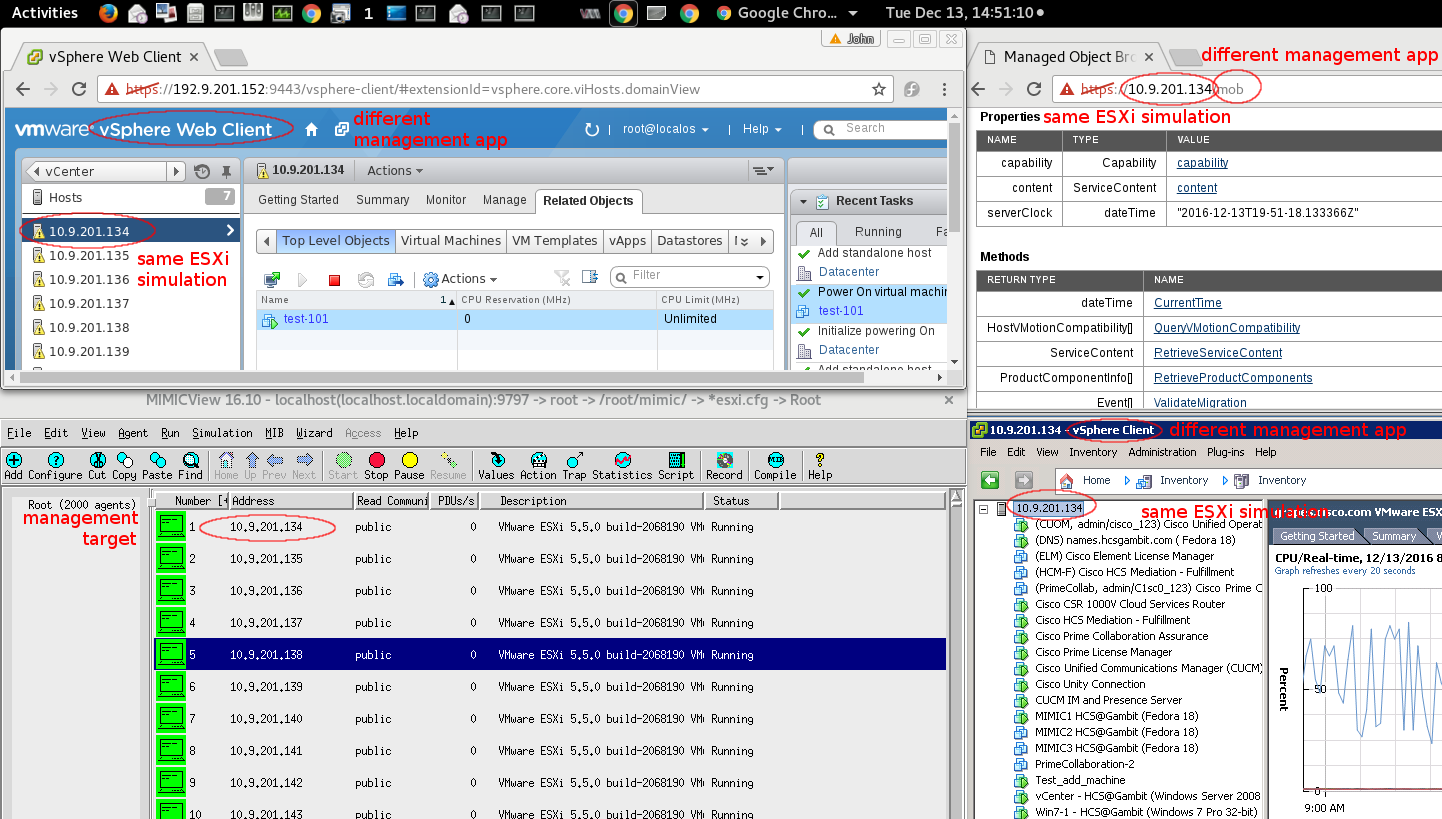
Any number of different management applications can manage any number of same or different simulated ESXi's simultaneously, as the following screenshot.
- Management Operations Simulation With vCenter
-
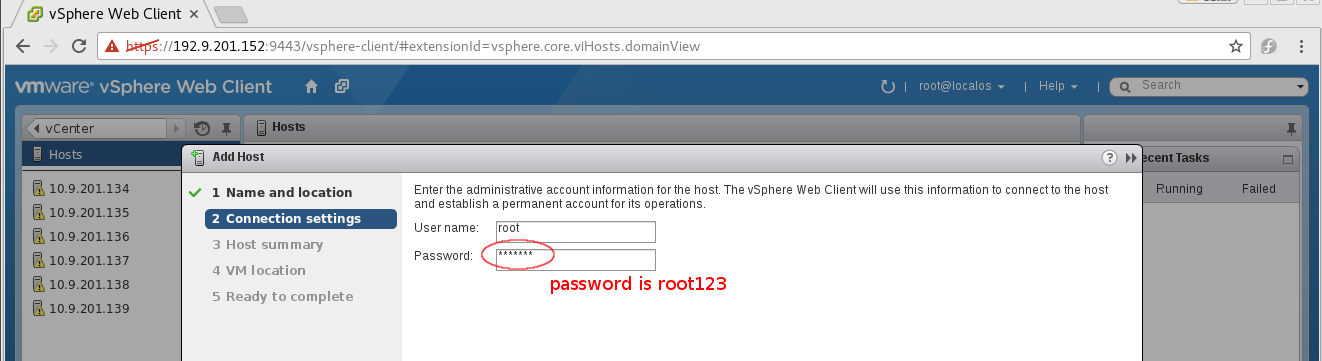
Adding ESXi simulation agents as standalone hosts to vCenter. In the browser vSphere web client
Hosts page, inside Add Host window, enter username root, password root123, as the following figure.
-
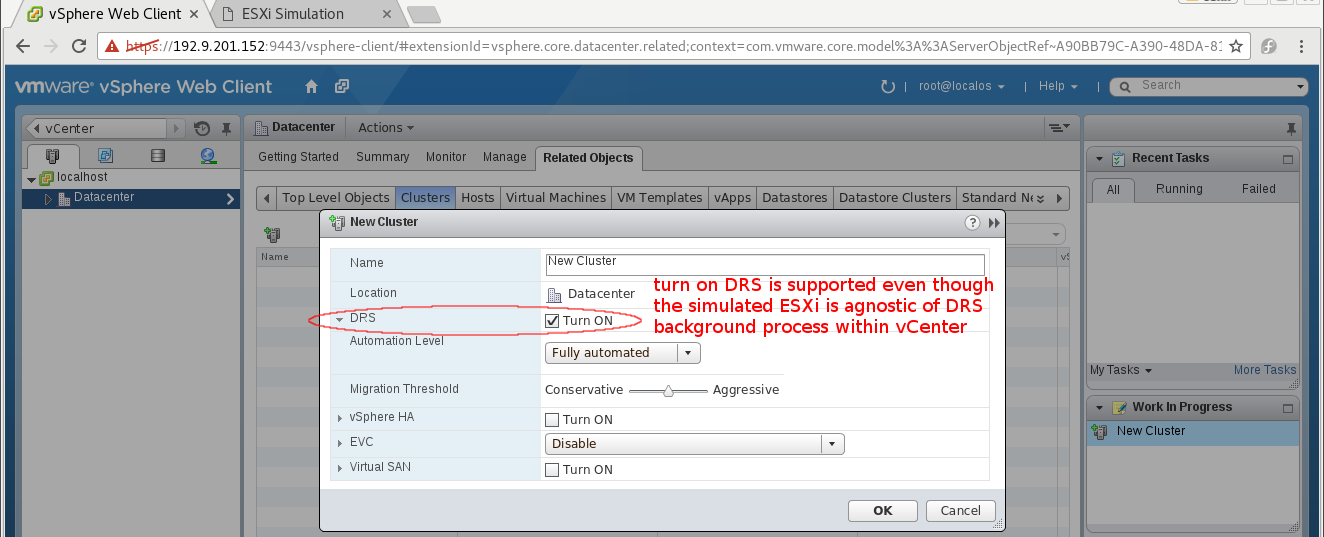
Adding ESXi simulation agents as cluster hosts to vCenter clusters, both DRS enabled and disabled clusters are supported.
To enable DRS, in New Cluster window, check Turn ON in DRS field as the following figure.
-
Starting/stopping VMs in ESXi agents using vCenter's procedure.
-
Adding new VMs in ESXi agents using vCenter's default parameters. See below example with assigning an NIC of a new VM to a new vSwitch port group.
-
vMotion. Relocating running VMs from one ESXi agent to another.
-
Realtime/Per day ESXi hosts and VMs performance graphing control via WEB Wizard and/or
via MIMICSh using CSV strings. First locate the counter in WEB Wizard by the graph title
and graph postion in the Monitor page, Performance tab as the following figure,
, double click a counter's branch in the wizard to edit it, copy and paste(middle button) CSV string, such as the following MemoryPercent values (copy the string into a text editor first to avoid unintended trailing blank space),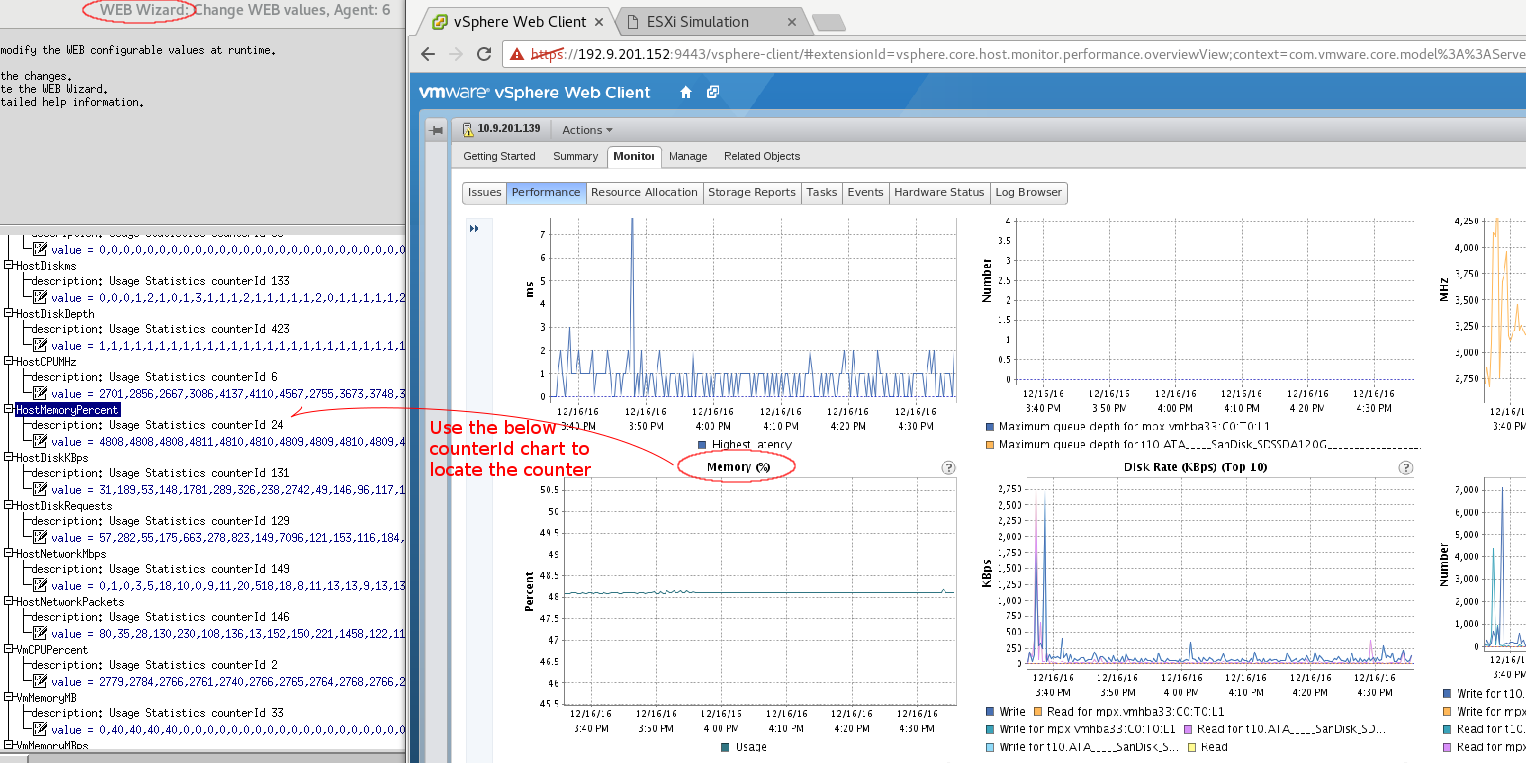
22,77,132,187,242,297,352,407,462,517,572,627,682,737,792,847,902,957,1012,1067,1122,1177,1232,
1287,1342,1397,1452,1507,1562,1617,1672,1727,1782,1837,1892,1947,2002,2057,2112,2167,2222,2277,
2332,2387,2442,2497,2552,2607,2662,2717,2772,2827,2882,2937,2992,3047,3102,3157,3212,3267,3322,
3377,3432,3487,3542,3597,3652,3707,3762,3817,3872,3927,3982,4037,4092,4147,4202,4257,4312,4367,
4422,4477,4532,4587,4642,4697,4752,4807,4862,4917,4972,5027,5082,5137,5192,5247,5302,5357,5412,
5467,5522,5577,5632,5687,5742,5797,5852,5907,5962,6017,6072,6127,6182,6237,6292,6347,6402,6457,
6512,6567,6622,6677,6732,6787,6842,6897,6952,7007,7062,7117,7172,7227,7282,7337,7392,7447,7502,
7557,7612,7667,7722,7777,7832,7887,7942,7997,8052,8107,8162,8217,8272,8327,8382,8437,8492,8547,
8602,8657,8712,8767,8822,8877,8932,8987,9042,9097,9152,9207,9262,9317,9372,9427,9482,9537,9592,
9647,9702,9757,9812,9867
, into the counter's text box, then click Apply . The graphing changes as this example figure,
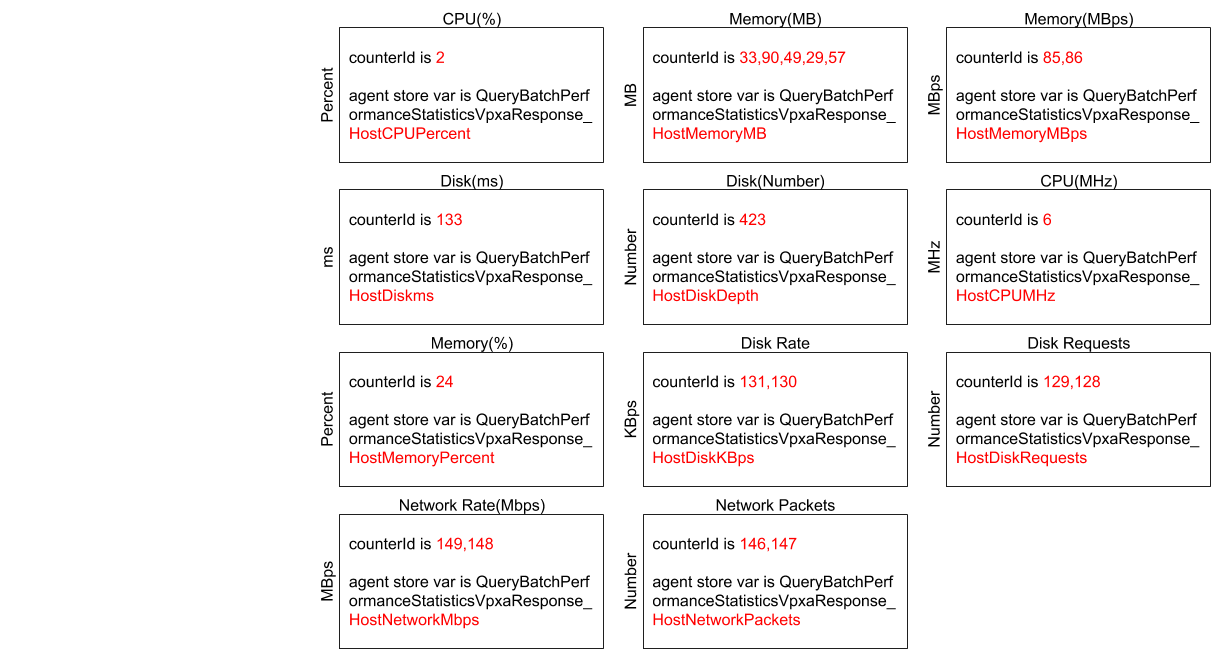
, refer to the counterId in this grid chart of the vCenter Host Monitor pages,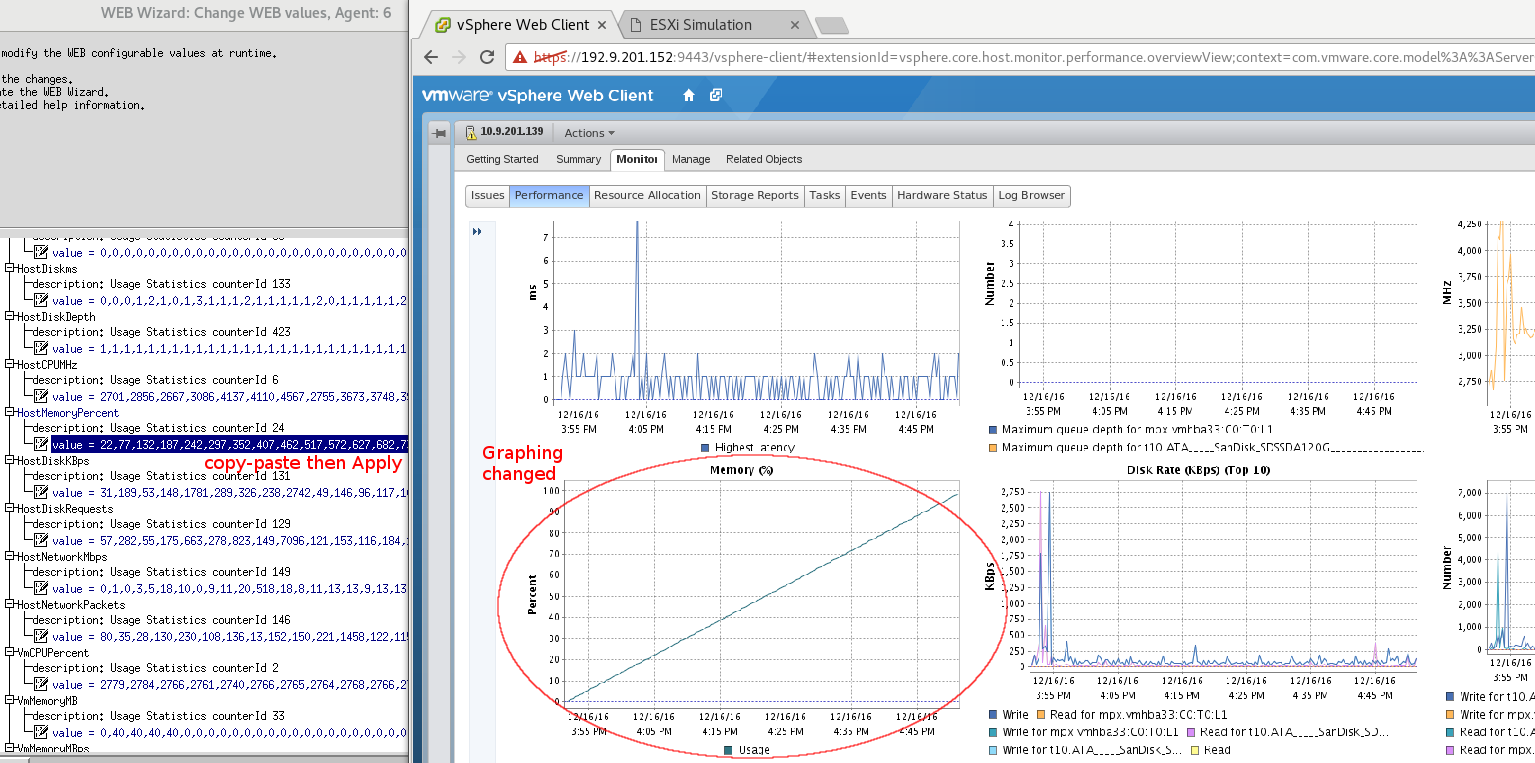
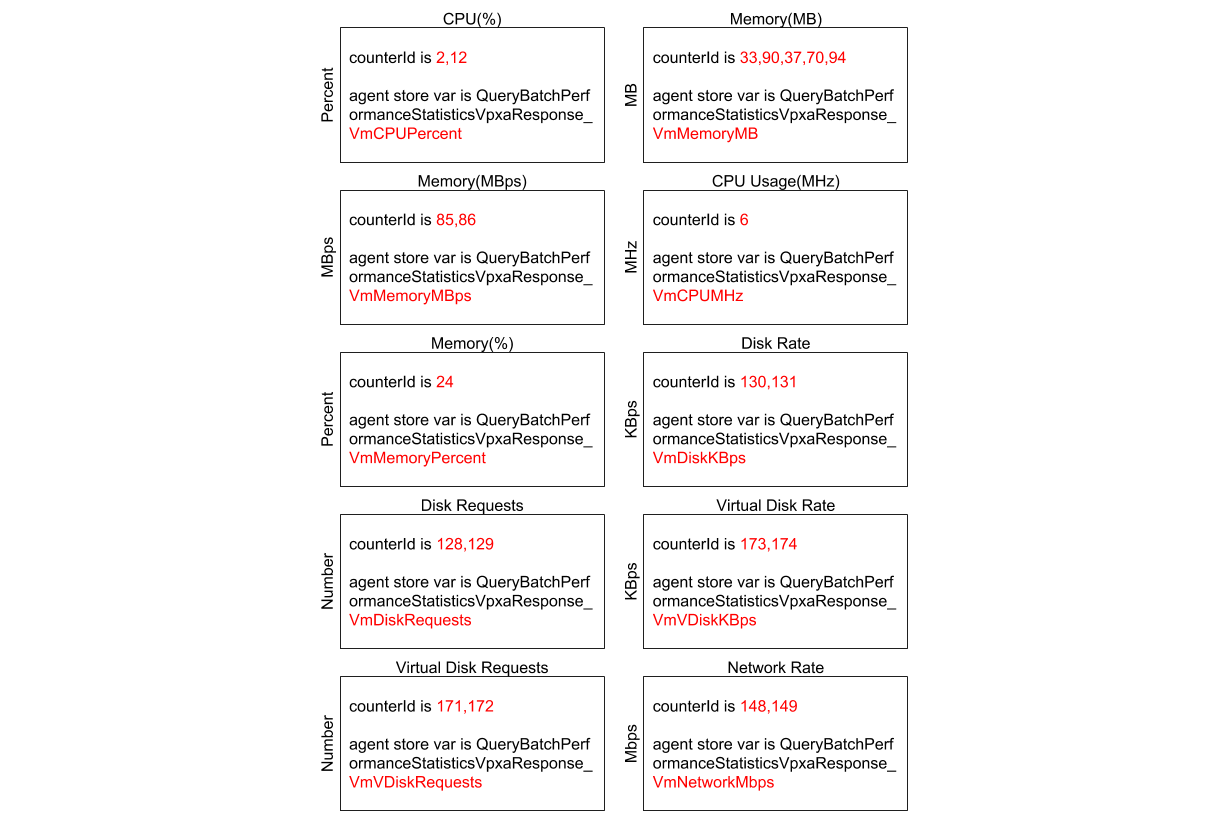
 , and refer to the counterId in this grid of the vCenter VM Monitor pages,
-
Removing ESXi agents from vCenter.
-
Resource Pool performance monitoring for hosts and VMs. Similar to Host/VM performance monitoring, but
select Resource Pools & Virtual Machines in the cluster's Monitor page Performance tab. Use the following grid
to locate counterId,

-
Storage performance monitoring for datastores. Similar to Host performance monitoring but select a data store in the inventory branch.
-
Adding DRS enabled datastore clusters, then add simulated datastores to clusters.
-
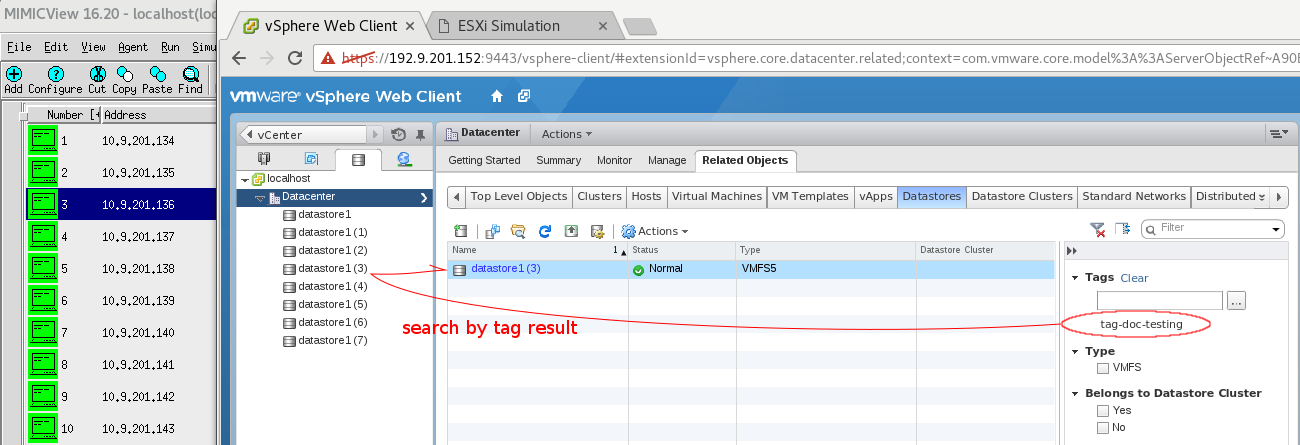
Adding tags to hosts, VMs, datacenters, datastores, or any object, as this figure,
, then search/filter listings by tags, as this figure,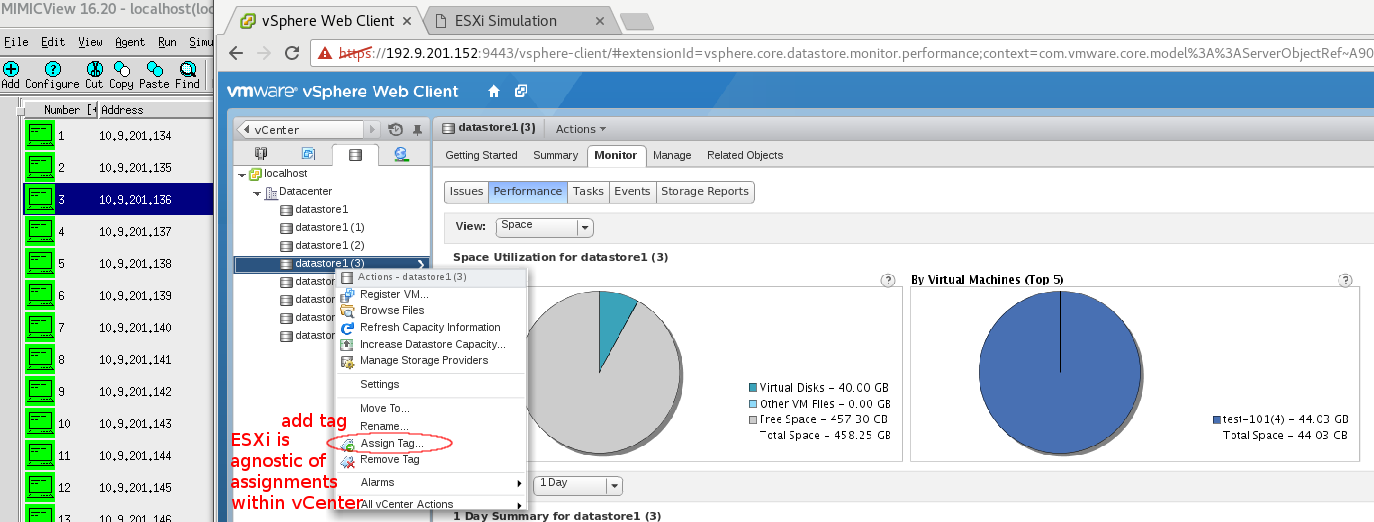
.
-
Adding vSwitch's , VM and/or kernel new port groups as this figure,
, then assign simulated inner VMs to the new networking as these 2 figures,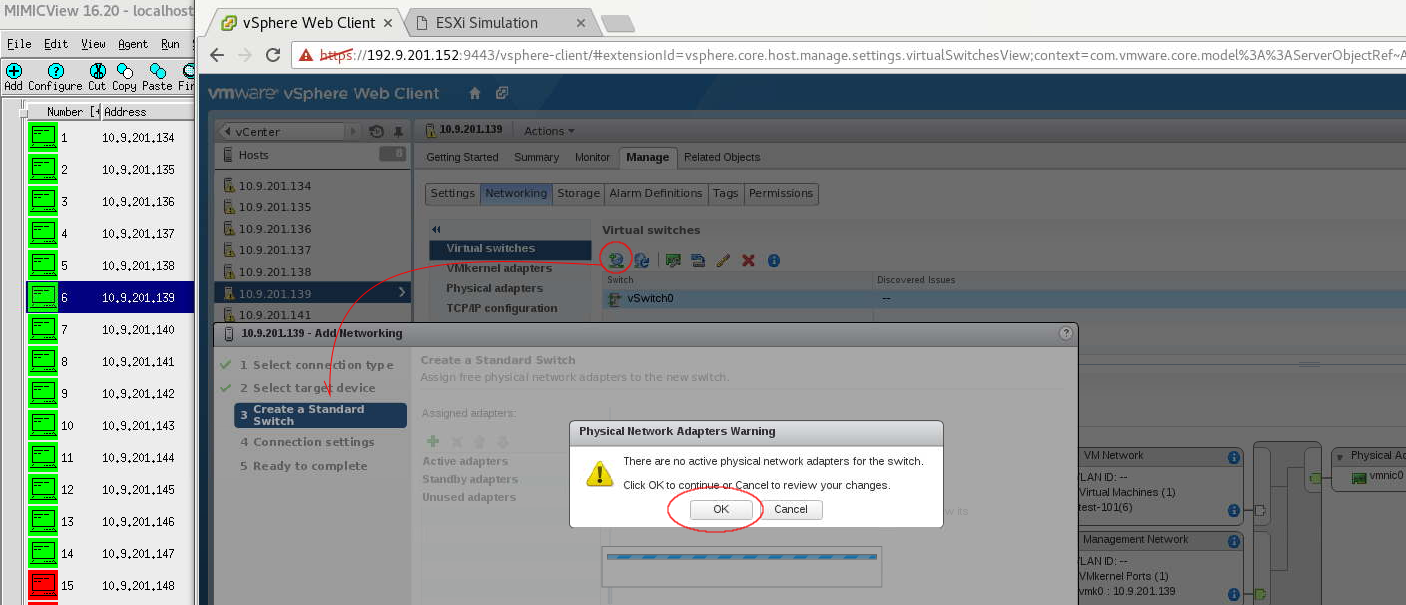
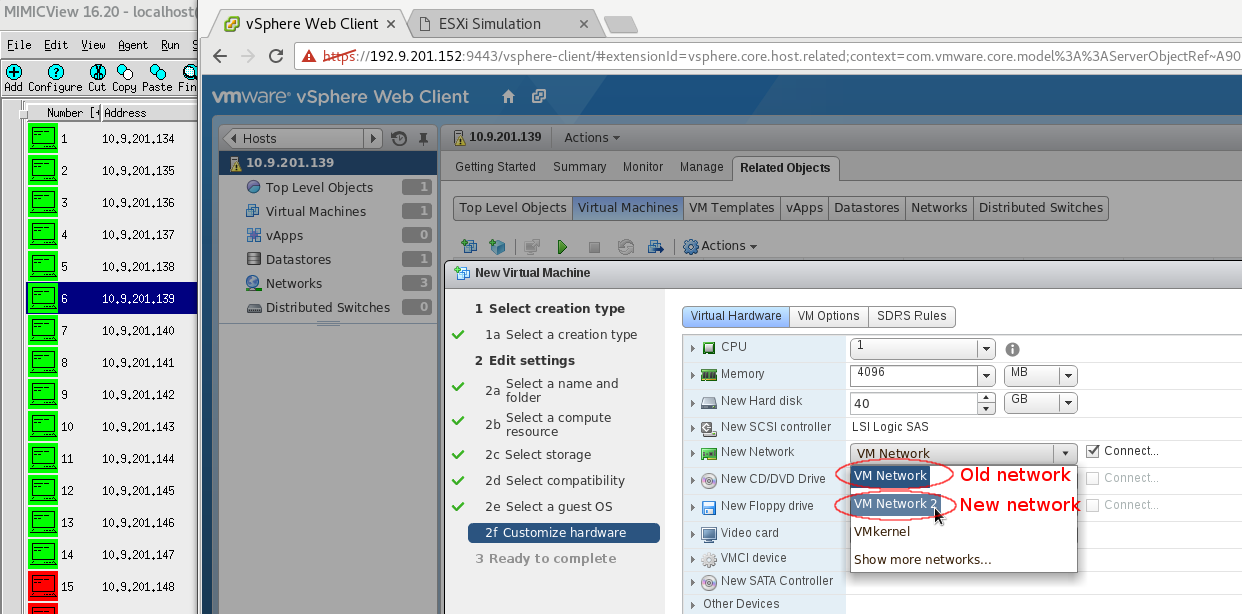
; you can reassign existing VMs to different networkings .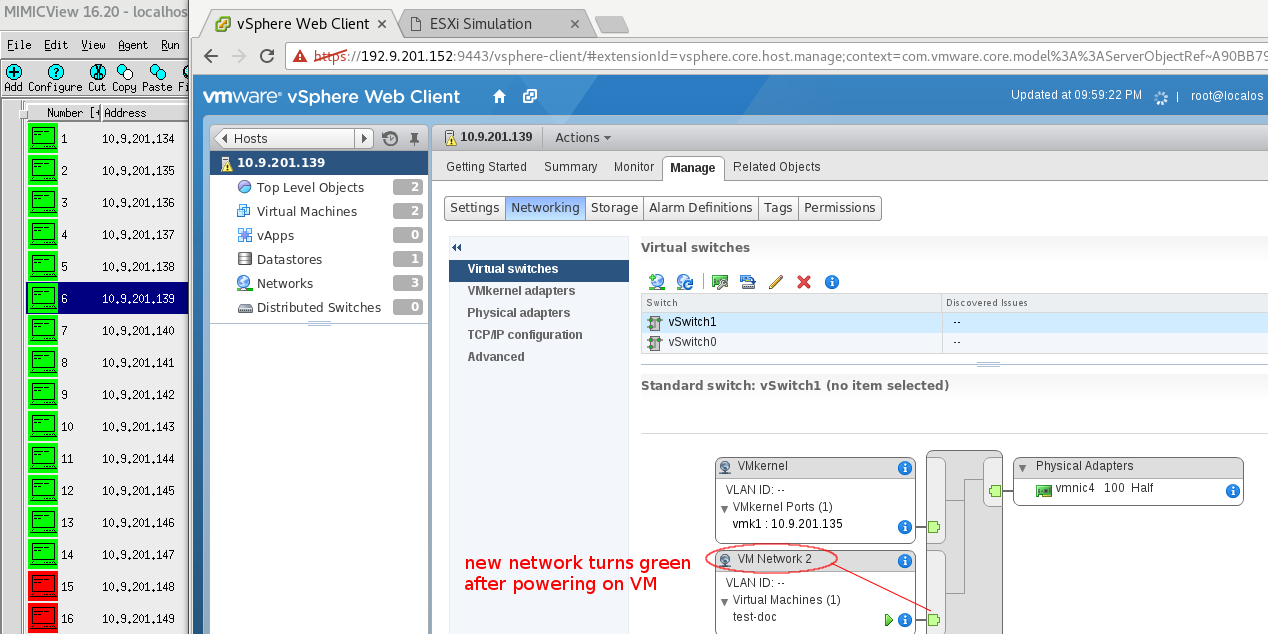
- Management With vSphere Client Direct Connect
-
Start/Stop a VM inside the ESXi agent.
-
Add virtual machines in bulk using script . See below for example with cloning VMs.
-
Cloning virtual machines in bulk using script . Example here uses MimicSh and sources the script
install-area/scripts/web/vsphere_xml_sim/add_new_vm_script.mtcl , then invoke commands add_new_vm or clone_vm .

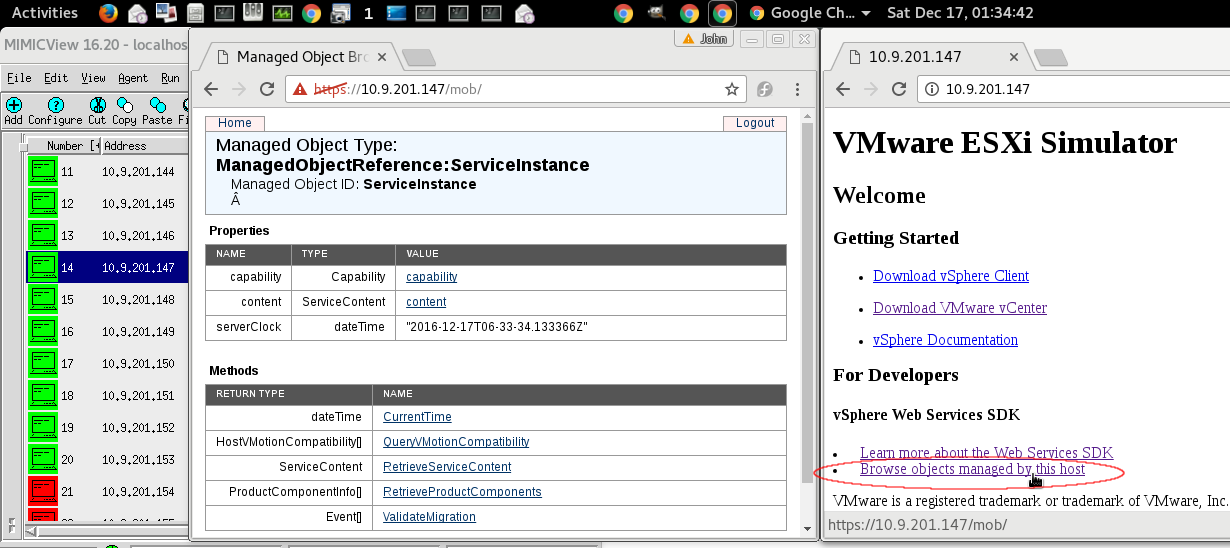
- Managing By Browser MOB Service
-
MOB Home->CurrentTime->Invoke Method .
-
Enter https://agent-ip/mob/?moid=11 , where MOID 11 is a guest VM object reference,
then PowerOnVM_Task->Invoke Method with MOID 1 as the host system ESXi itself that boots guest VM 11.
-
Enter https://agent-ip/mob/?moid=11 , where MOID 11 is a guest VM object reference,
then PowerOffVM_Task->Invoke Method .
-
Enter https://agent-ip/mob/?moid=19 , where MOID 19 is a guest VM object reference,
then PowerOnVM_Task->Invoke Method with MOID 1 as the host system ESXi itself that boots guest VM 19.
-
Enter https://agent-ip/mob/?moid=19 , where MOID 19 is a guest VM object reference,
then PowerOffVM_Task->Invoke Method .
-
MOB Home->RetrieveServiceContent->Invoke Method . Then still in the result page, enter ha-perfmgr object,
and QueryPerfProviderSummary->Invoke Method with MOID 1 as the ESXi host itself.
-
MOB Home->QueryVMotionCompatibility->Invoke Method . Result is NotSupported because ESXi without vCenter management can not perform vMotion.
-
MOB Home->RetrieveProductComponents->Invoke Method . Result is void.
- MOB Home->ValidateMigration->Invoke Method. Result is invalid.
- Record And Create Your Own vCenter Managed ESXi Simulation
-
Before recording
1) The to-be-recorded ESXi should be already managed by a vCenter . This will reduce licensing issues during recording by keeping ESXi under vCenter management. We will refer to this vCenter as "holding" vCenter.
2) If your ESXi has not been added to a holding vCenter, add it before proceeding. There will be totally two vCenters through out this procedure as the following example diagram.

-
Recorder setup
1) Set up the vCenter that you would like to record web traffic. This vCenter is separate from the holding vCenter. This vCenter will be referred to as recording vCenter.
2) You need to have a MimicD running with 2 PROXY agents to relay VMware proprietary, non-WEB traffic during the WEB protocol recording. Set up agent 1 to relay UDP heartbeat and agent 2 to relay TCP port 902 proprietary traffic. UDP packet destination will be the recording vCenter during recording, to prevent vCenter from timeout-disconnect ESXi; TCP port 902 traffic will be destined to the real ESXi, to allow vCenter downloading licensing from the real ESXi. Both agent 1 and 2 use the same IP address as WebRec host. To avoid agent 1 and agent 2's SNMP port conflict, change agent 1's SNMP port to 163; change agent 2's SNMP port to 164.
3) You need to retrieve the HTTPS server key of the to-be-recorded ESXi for recording process to present it as a HTTPS-SSL server of the to-be-recorded ESXi. Run the following CLI command in the ESXi's SSH terminal,
# cat /etc/vmware/ssl/rui.key /etc/vmware/ssl/rui.crt > rui-10.1.10.22.pem
, then scp download the rui*.pem file saving it to the MIMIC WebRec host.

-
Start recording
1) Determine the IP address string substitutions , replace-up and replace-down, for webrec command line. The traffic from the ultimate HTTPS client(the recording vCenter) to the ultimate HTTPS server(the ESXi) is referred to as "up" traffic ; the traffic from the ultimate HTTPS server to the ultimate HTTPS client is referred to as "down" traffic. In either traffic direction, substitute the IP addressing with WebRec's IP address, so that the recording vCenter thinks that WebRec's IP address is ESXi's IP address and so that the recording vCenter won't try to send WEB packets directly to the ESXi, bypassing WebRec. For the down traffic, the substitution will make ESXi thinks that WebRec's IP address is recording vCenter, so that ESXi won't try to send WEB packets directly to the vCenter, bypassing WebRec.
2) The webrec command line for this example is
c:\Apps\Mimic.1610\bin>webrec.exe --outfilename webrec-vcenter55.log --dest-ip 10.1.10.22 --dest-port 80 --dest-ssl-port 443 --servercert rui-10.1.10.22.pem \
       --port 80 --ssl-port 443 --replace-up 10.1.10.9,10.1.10.26 --replace-down 10.1.10.22,10.1.10.26
3) Start proxy agent 1 and 2, make sure binding port and accepting port are correctly opened in the operating system. Start webrec process.
4) In the reocrding vCenter, add WebRec's IP address as the ESXi's IP address, with the standard procedure of adding a ESXi to a vCenter. Use the real ESXi's root password as the root password for adding the WebRec relayed ESXi. Accept warning of SSL fingerprint. Your network will reach the state of this diagram,
-
Finish recording
1) After accepting SSL fingerprint of WebRec, continue the dialog of adding ESXi host to the recording vCenter until you click the "Finish" button. When the recording vCenter deems necessary, it will initiate licensing download request toward ESXi's IP address, which WebRec masquerades, but agent 2 will catch the licensing traffic and relay it to the real ESXi. So, your network will reach this state,

2) vCenter requests will instruct the ESXi to direct its heartbeat to the new vCenter, which WebRec masquerades. All ESXi traffic toward vCenter will destine to WebRec's IP address, heartbeat traffic is no exception. Agent 1 will relay the traffic to the recording vCenter.

-
Post recording processing
1) Once you have performed desired exercises, stop WebRec process by pressing Ctrl+C in the terminal of WebRec. The recorded WEB traffic is saved in the webrec-vcenter55.log file in this example. The log file has generic HTTP traffic records.
2) Convert the HTTP traffic record to SOAP rule file of MIMIC WEB simulator by running command webconv. For this example, the command line:
c:\Apps\Mimic.1610\bin>webconv.exe webrec-vcenter55.log
, and the resulting rule file set is rulefile_webrec-vcenter55.rul and rulefile_webrec-vcenter55.mtcl .
3) Modify the rulefile_webrec-vcenter55.mtcl to handle dynamic SOAP traffic patterns. For example, VPXA service SOAP management "sessionID" is given by vCenter, unique for each management session, but WebRec only saved the one session that you recorded. The script needs to responds to queries according to the dyanmically assigned sessionID.
-
Simulation setup
1) You can destroy the recorded ESXi after the recording, or you can diesconnect the recorded ESXi from the LAN network.
2) If for any reason a different ESXi will be used for licensing, add the new ESXi to vCenter as you normally add an ESXi host. The proprietary protocol will finish licensing , as this diagram,

-
Running ESXi simulations
1) The single recorded-converted WEB rule file can be applied to multiple MIMIC agents.
2) For all ESXi simulation agents, 3 protocols need to be enabled, SYSLOG, PROXY, and WEB.
3) In the SYSLOG tab, set port to 902, target is the vCenter's IP address
4) In the PROXY tab, set port to 902, target is the new real ESXi's IP address with the ",902" ending for destination port number
5) Choose any SNMP simulation device for the agent simulation but copy 4 scripts in install-area/data/sim/dev-esxi55.random/,
start+heartbeat.mtcl
timer+heartbeat.mtcl
start+pcsync_https.mtcl
timer+start_pcsync_https.mtcl
, into your device's directory to enable HTTPS SSL and ESXi heartbeat.
6) Choose any IP address for the agent simulation
7) In the WEB tab, browse and select rulefile_webrec-vcenter55.rul for our example

This update package ships a basic Web simulation of a VMware ESXi hypervisor . The intent is to scale up a vCenter installation by adding simulated ESXi hypervisors to at least one real ESXi.
Compatible vCenter, ESXi, vSphere client, and browser versions
| vCenter | ESXi | vSphere Client | Browser |
| 5.5.0 build 4063694 |
5.5.0 build 3248547
5.5.0 build 2068190 5.1.0 build 1065491 |
5.5.0 build 3024345
5.5.0 build 1993072 |
Recent Chrome browser on Linux or Windows |
| 5.5.0 build 2414847 |
5.5.0 build 2068190
5.1.0 build 1065491 |
5.5.0 build 3024345
5.5.0 build 1993072 |
Recent Chrome browser on Linux or Windows |
To run this simulation, you must have installed the following optional modules as documented in the online documentation:
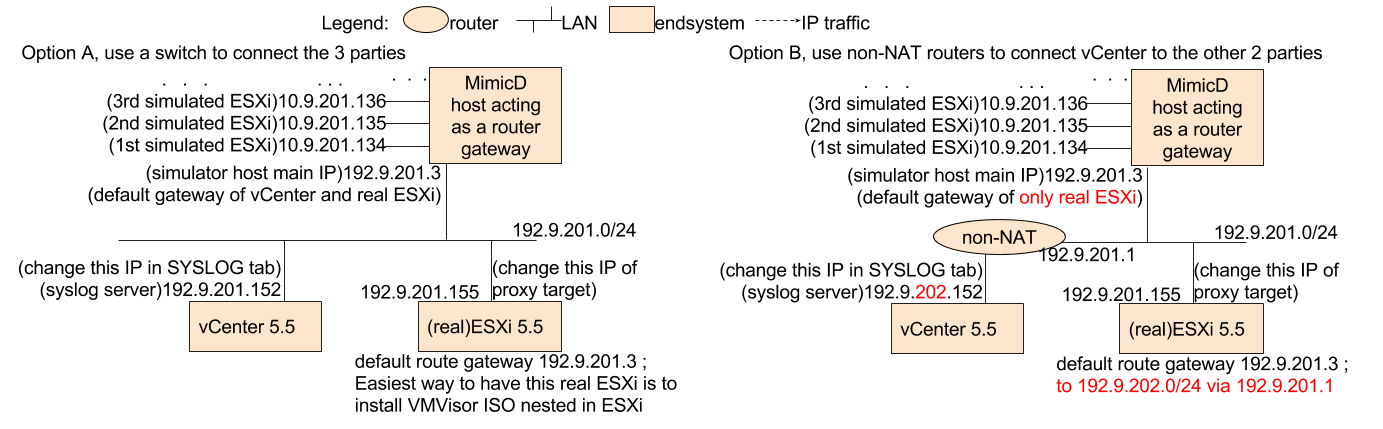
You will also require a real ESXi under evaluation license to issue license to vCenter. Examples of setup of the 3 parties are as the following diagram.
To install the prerequisites,
To run the simulation, invoke the File->Open menu from the MIMICView GUI, and select the esxi.cfg file.
Supported management operations:
Supported operations as follows,
Enter URL https://agent-ip/mob , or enter agent IP in browser and follow mob hyperlink,