MIMIC® Online Documentation
Cisco C210 UCS Server Simulation With VOIP Applications
-
Table of Contents
-
Overview
This update package ships an Web simulation of a Cisco C210 UCS server with VOIP phones and collaboration applications.
-
Prerequisites
To run this simulation, you must have installed the following optional modules as documented in the online documentation:
- WEB Services
- TELNET
- SSH
- SYSLOG
- TFTP
[root@localhost optional]# mv ssh.so syslog.so telnet.so tftp.so web.so ../

[root@localhost optional]# pwd

/usr/local/linux.1620B5/bin/dynamic/optional
-
Usage
To run the simulation, invoke the File->Open menu from the MIMICView GUI, and select the hcs.cfg file.
Select agent 1 and change its IP address, if necessary. Start it using the Agent->Start menu item.
After the agent starts completely and turns into green, you can test the WEB Services simulation by using any WEB Services client application.
-
Compatibility
Cisco Prime Collaboration Cisco Hosted Collaboration Mediation-Fulfillment EMC SMARTS HP Enterprise NNMi Browser Version 10.5.1 build 53684 Version 10.1.1.98010-2 Version 9.3 Version 10.20 with IPT Recent Chrome browsers
on Linux or WindowsExtensive support for Cisco Prime Collaboration:

This simulation also works with EMC SMARTS:
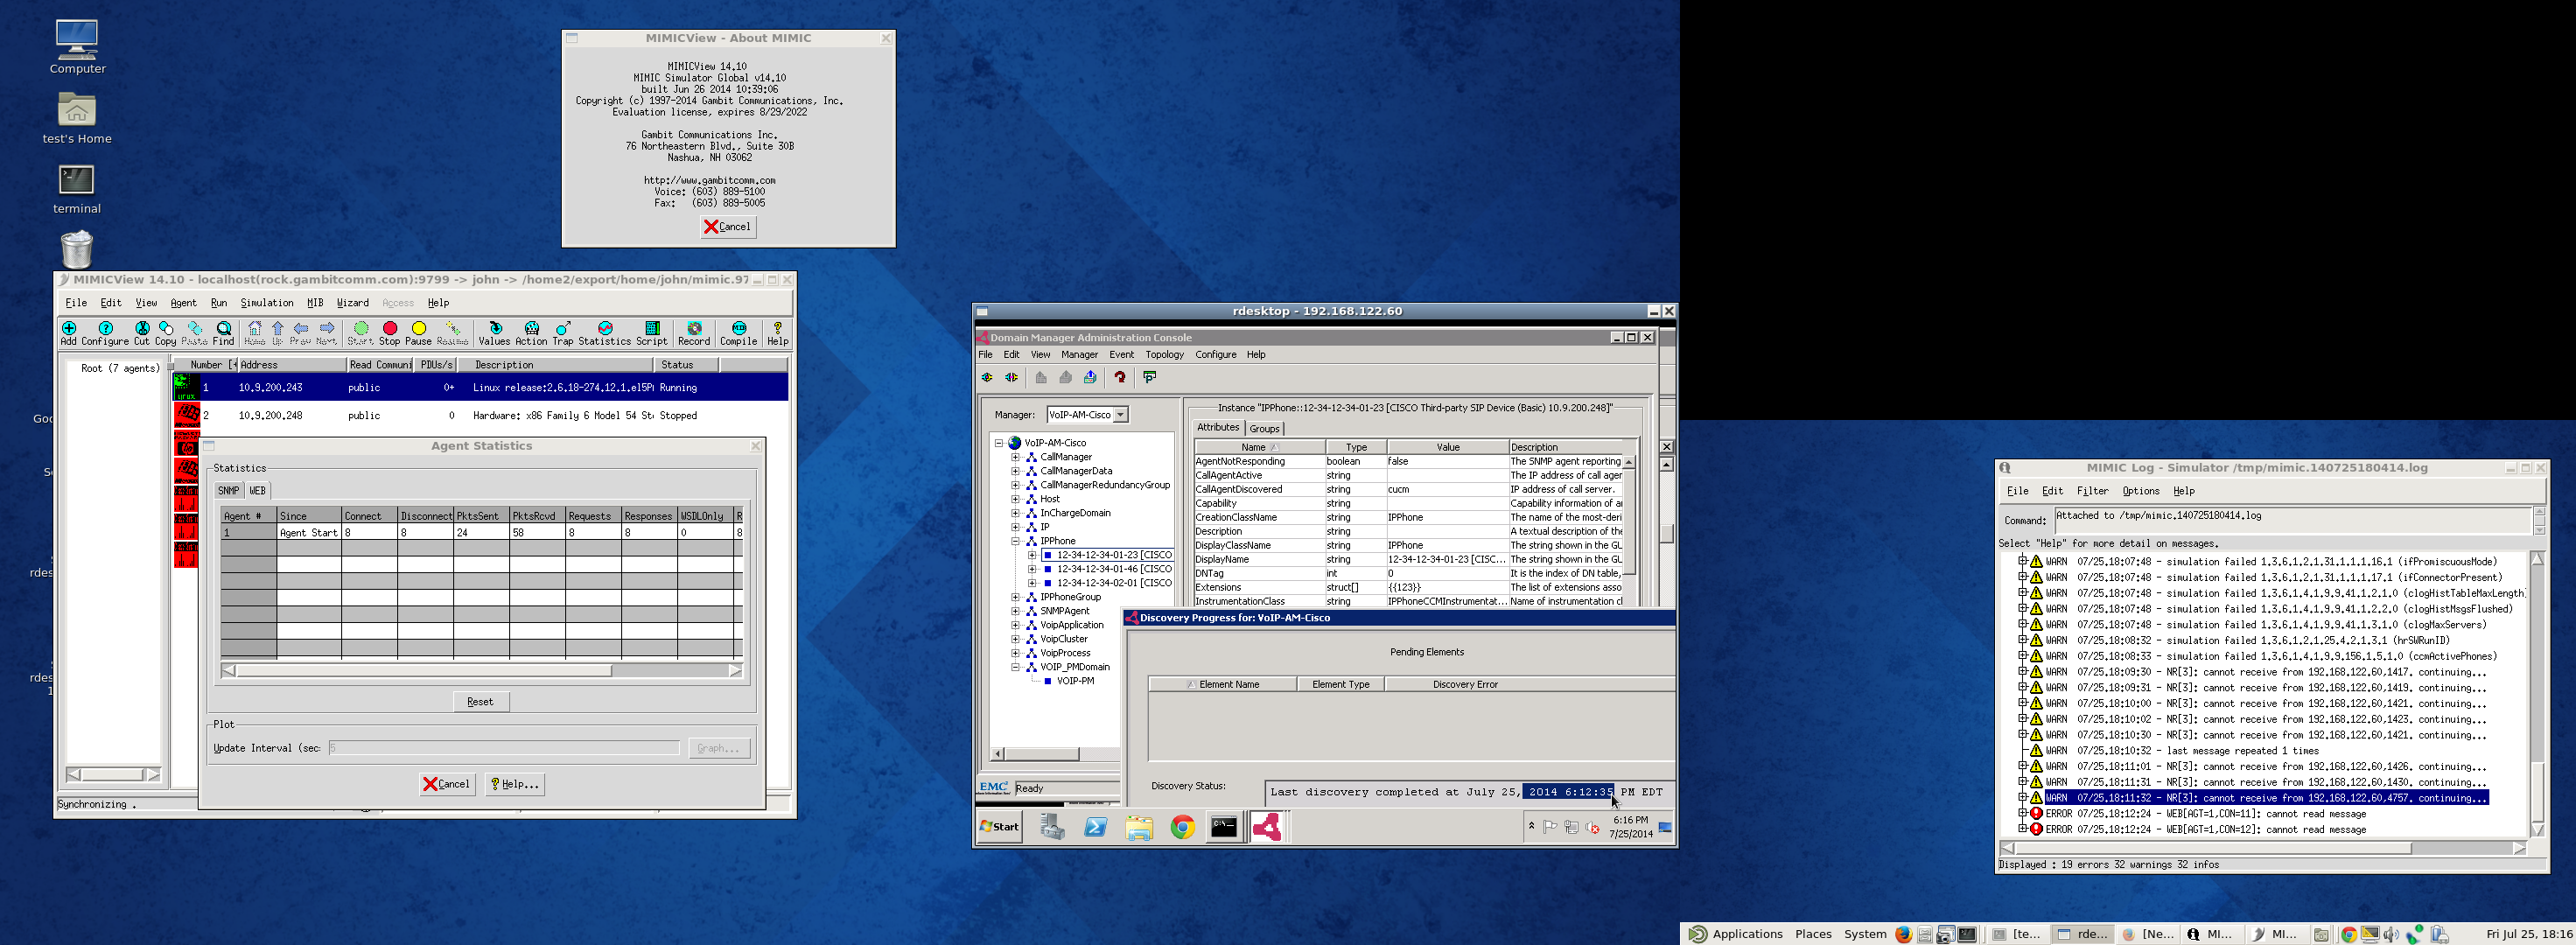
The Agent->Statistics menu can be used to check various statistics for the WEB Services protocol in use. Also the mimiclog for the active session will contain useful debug information.
-
Cisco Prime Collaboration Operations Simulation
Supported operations as follows:
-
Adding applications agents with NAT.
Before you begin the operations, add a hosted customer in Prime Collaboration, Administration->Customer.
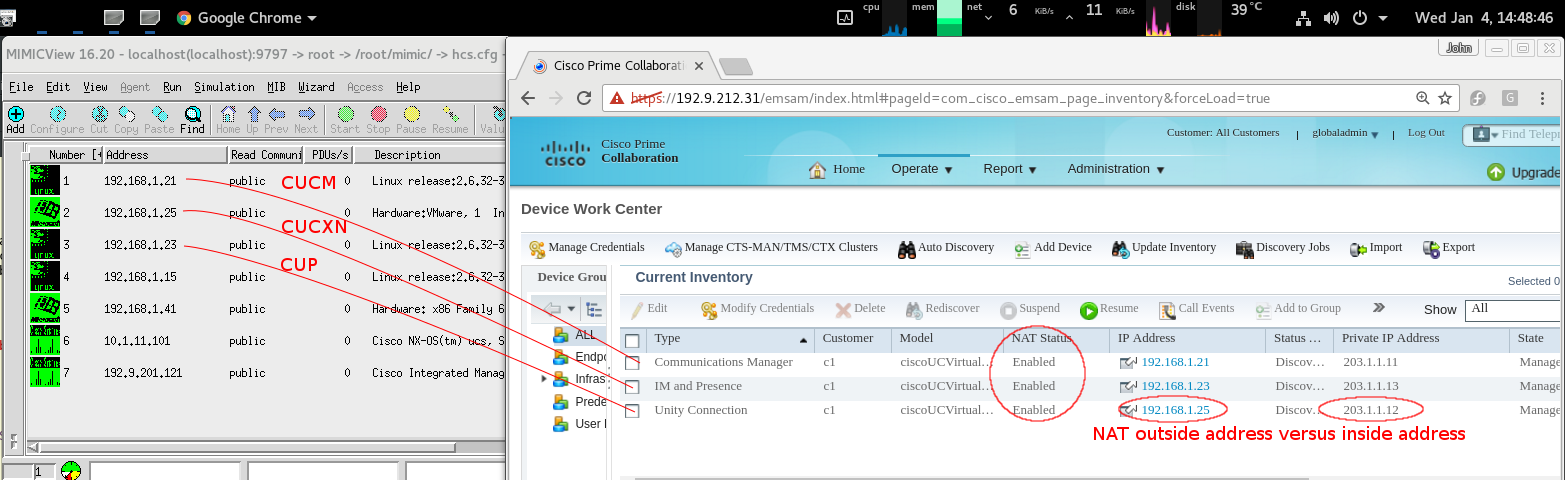
To add CUCM/CUCXN/CUP application agents , in Operate->Device Work Center->Add Device wizard, enter IP addresses as the following. SNMP version 2c, community string public, HTTP username admin, arbitrary password (admin as example).

The NAT inside address will be discovered as this figure. NAT Status is Enabled.
-
Duplicate customers per MIMIC Virtual Lab Pod
In MimicSh, use the pod_initialize.mtcl and pod_duplicate.mtcl scripts as the following. In Customer Management page, add one customer per pod.
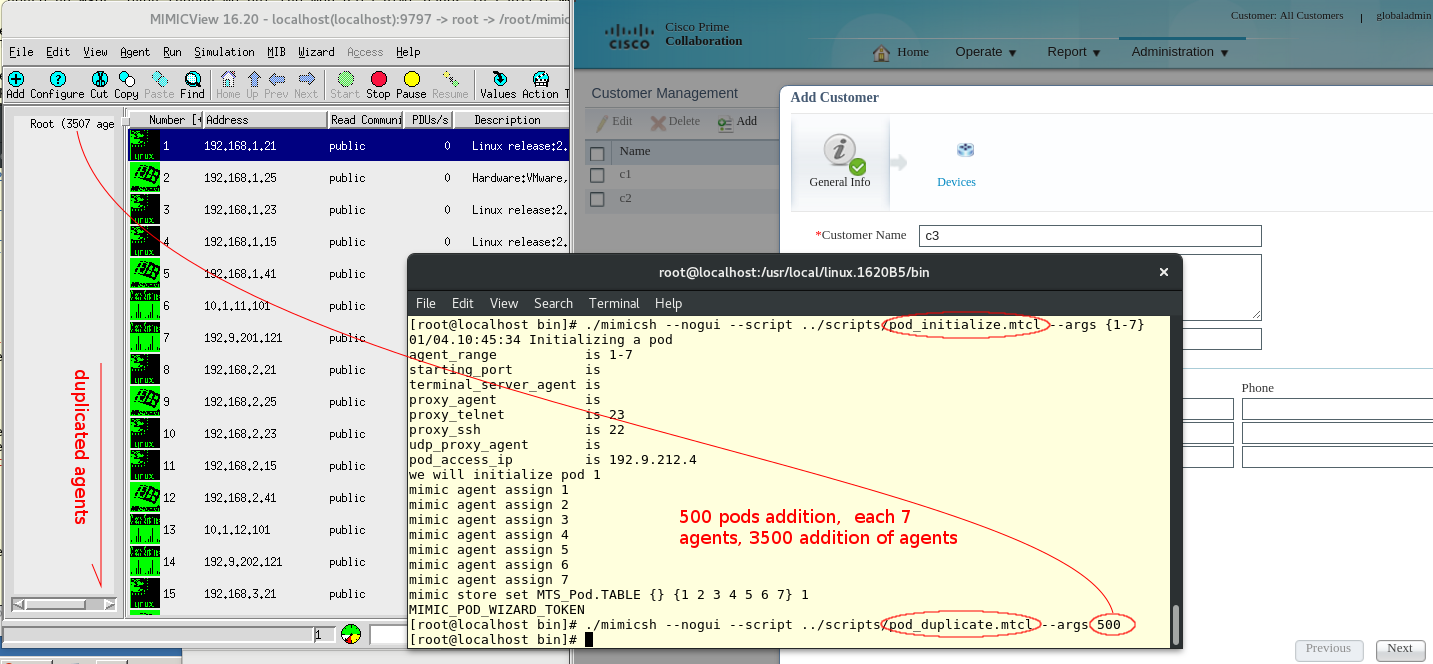
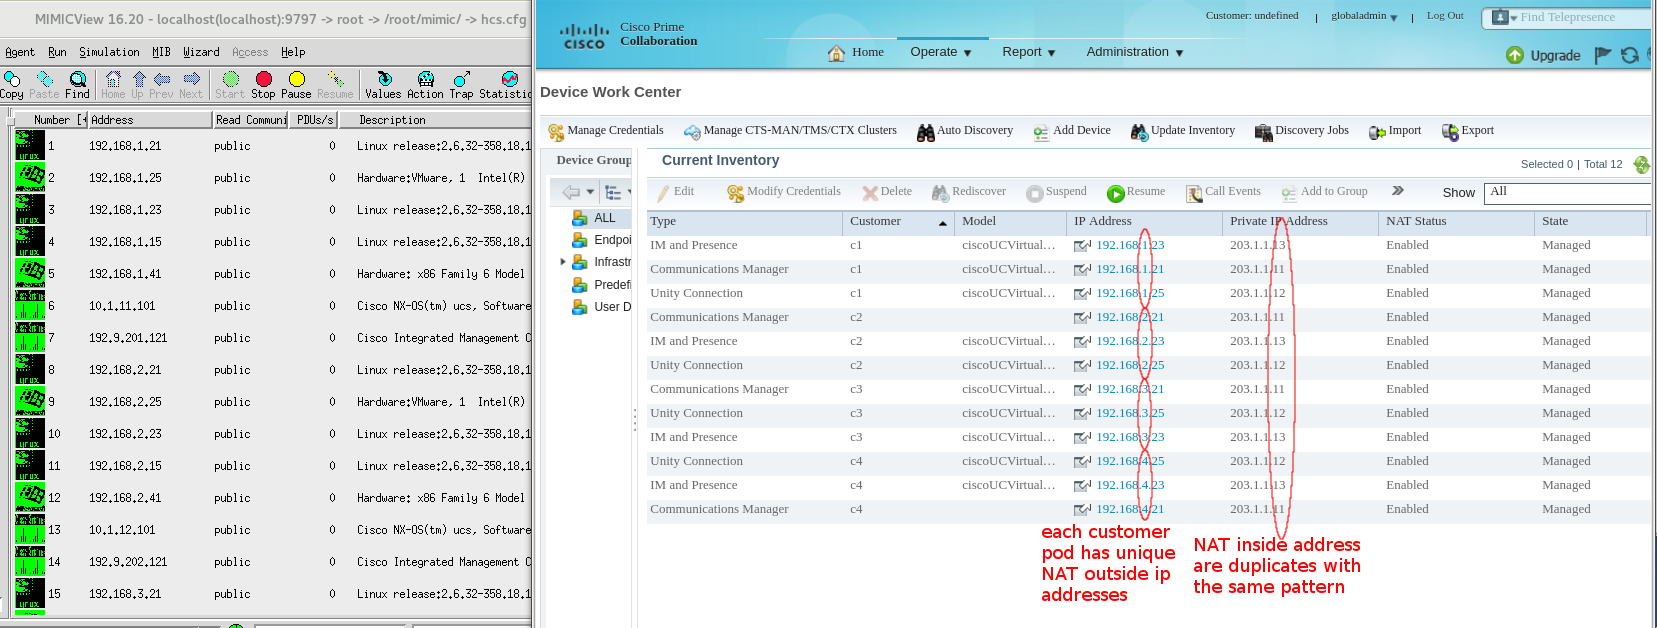
After the new agents are discovered, each customer pod will have unique NAT outside addresses while inside addresses are duplicates in the same pattern as the original pod.
-
Performance graphing controlled by WEB Wizard
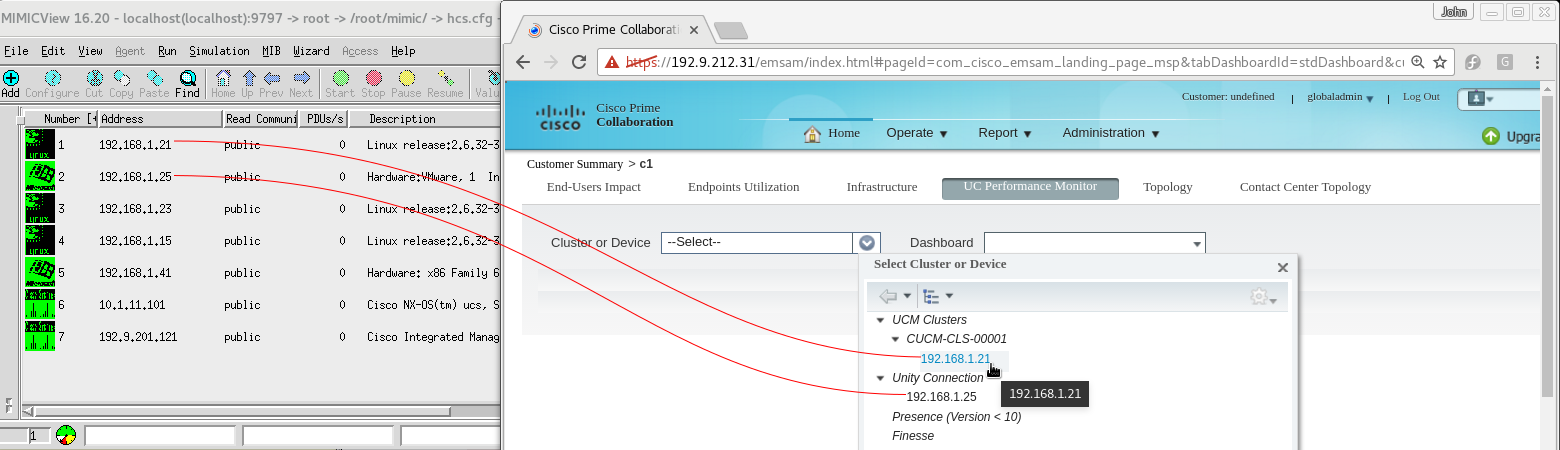
In Prime Collaboration Home, select a customer from Device Summary table, then select CUCM cluster agent 1 as this,
Then, open the Custom Dashboard wizard by clicking the green "+" sign next to the Dashboard text box. In the wizard, look for the Processor branch on the left pane and select CPU instances to monitor. Custom polling is recommended because the convenient pre-set pollings all may not be suitable for all versions of CUCMs, real or simulated.
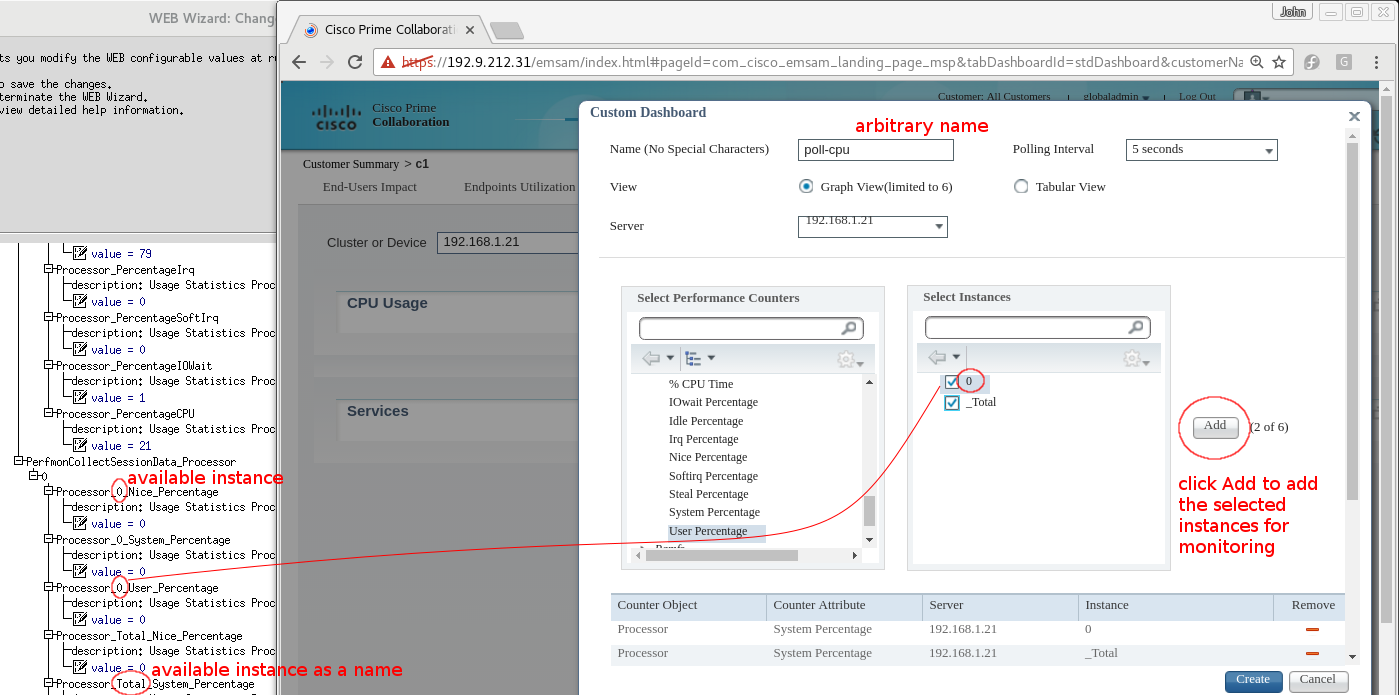
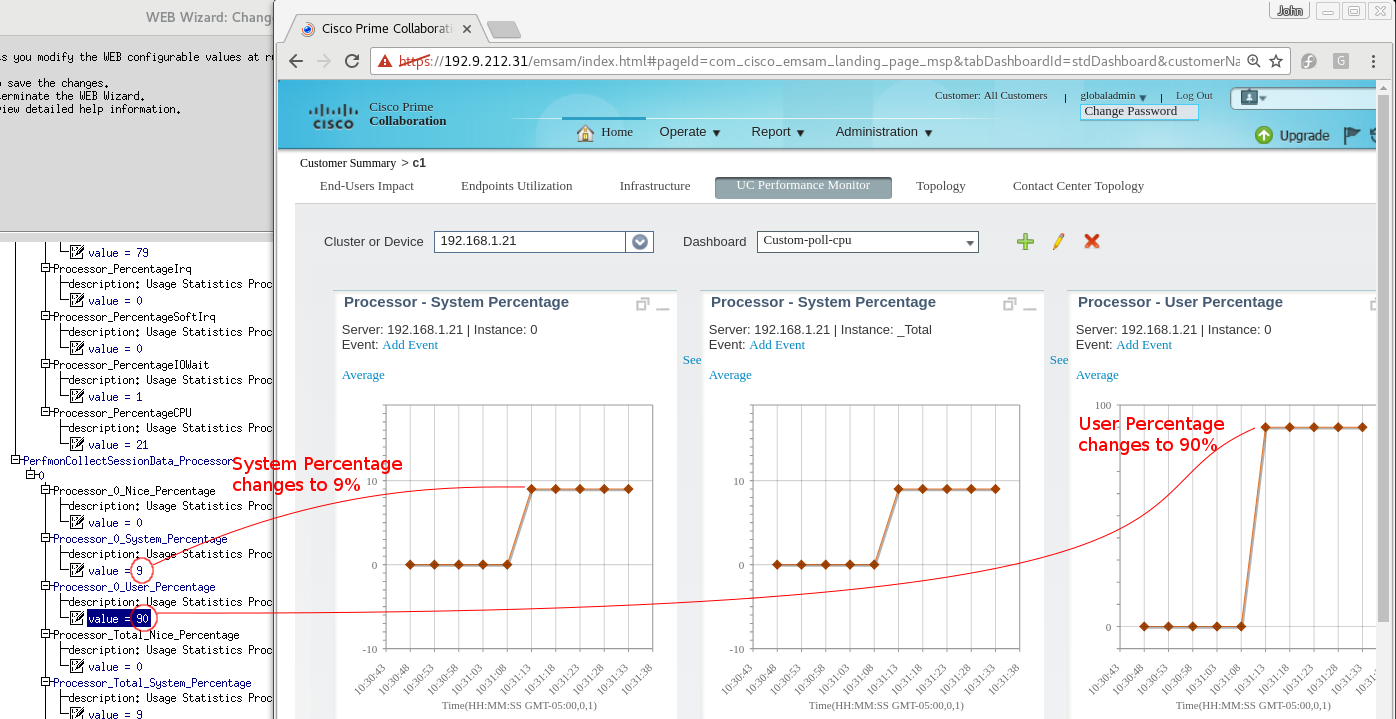
In WEB Wizard, locate the counter variable, and double click the Value node to change the counter value.
-
Open agents in browsers
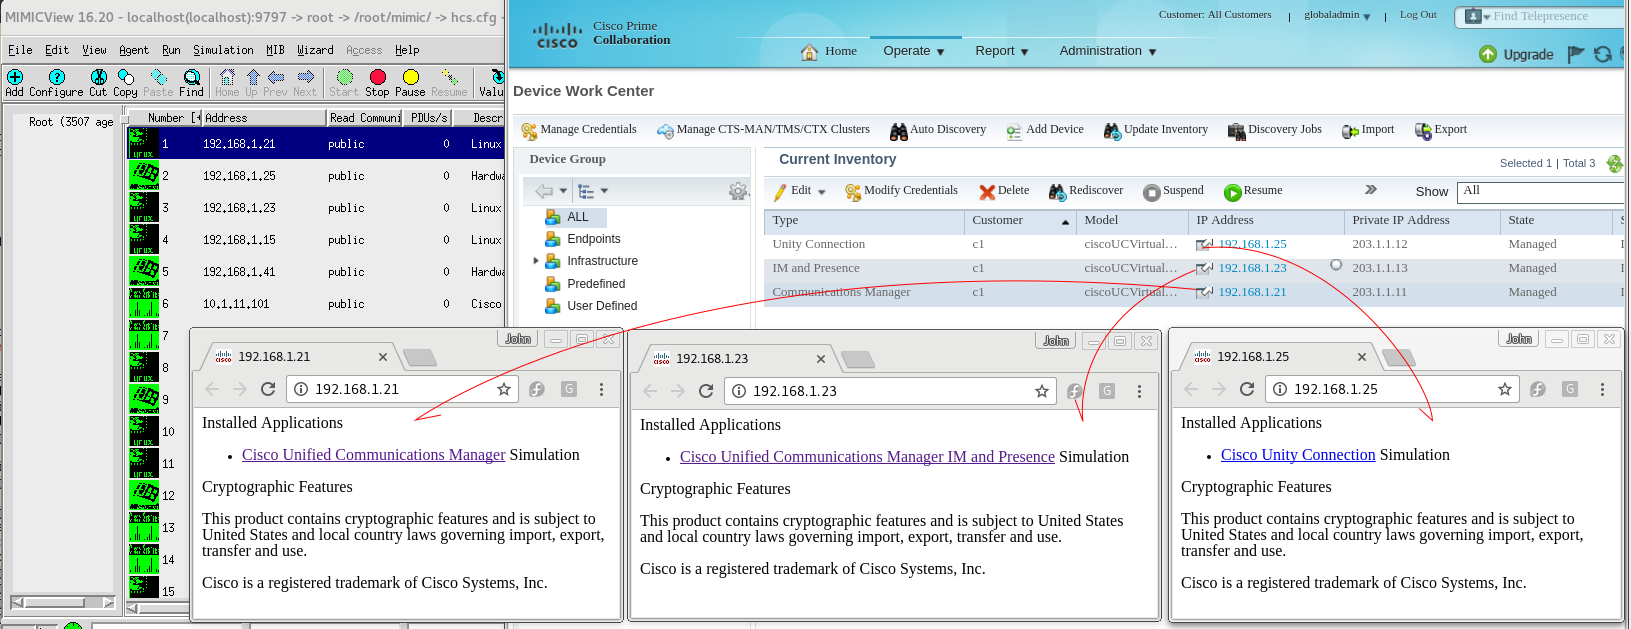
In Prime Collaboration Device Work Center, click on IP Address field of an agent will pop up a browser window to the application agent's home page,
-
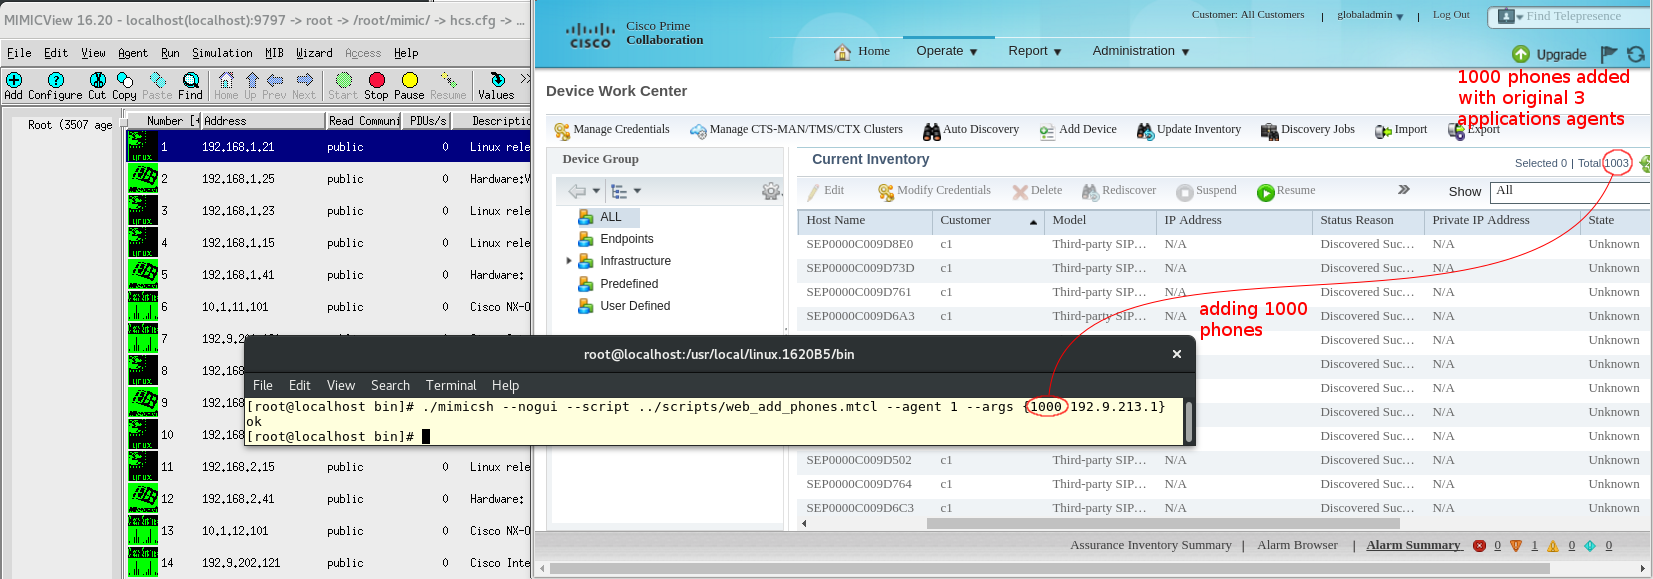
Add phones in bulk
In MimicSh, use the web_add_phones.mtcl script as the following to add phones.
The phones are discovered daily at midnight. To test the result quickly, change Prime Collaboration system's clock as this example,
[john@rock test]$ ssh -p26 root@192.9.212.31

root@192.9.212.31's password:

Last login: Wed Jan  4 11:10:22 2017 from 192.9.212.3

[root@primecollab ~]# date

Wed Jan  4 13:51:39 EST 2017

[root@primecollab ~]# date -s 'Wed Jan  4 23:55:39 EST 2017'

Wed Jan  4 23:55:39 EST 2017

[root@primecollab ~]# date

Wed Jan  4 23:55:40 EST 2017
-
-
Recording And Simulating With HPE NNMi
Use the following procedure to record a CUCM and add it to HPE NNMi,
-
Establish SSL Trust Relation Between NNMi And Simulator
The SSL certification in MimicView DEVHCS package is in the installation-area/config/web/cucm.gambitcomm.com.pem file. Transfer this file to NNMi host, then truncate the "-----BEGIN RSA PRIVATE KEY-----" to "-----END RSA PRIVATE KEY-----" heading private key. Then insert the certificate using the following command,
c:\ProgramData\HP\HP BTO Software\shared\nnm\certificates>"c:\Program Files (x86)\HP\HP BTO Software\bin\nnmkeytool.ovpl" -import -keystore nnm-trust.p12 -storetype PKCS12 -alias cucm-nnmi -file c:\Users\Administrator\Desktop\cucm.gambitcomm.com.pem
Our example setup is as the following diagram,
Before starting MimicD, set the environment variable MIMIC_ADAPTIVE_VSPACE to 0 by the following command,
[root@localhost bin]# export MIMIC_ADAPTIVE_VSPACE=0
Once MimicD is started, load agent configuration hcs.cfg. . Then, add a route in NNMi host to reach simulated agents using the following command,
c:\>route add 192.168.0.0 mask 255.255.0.0 10.9.10.3
, where 10.9.10.3 is our example MIMIC host IP address. If you don't have access to real CUCM, jump to below step 6. -
Start CUCM AXL Soap and SNMP services
Start all CUCM services by selecting all services in CUCM management interface's Servicibility page, Tools->Activate Services menu item. Download the real CUCM's SSL server certificate in CUCM management interface's OS Administration page, Security->Certificate Management->tomcat->cucm->Download .PEM . Transfer this tomcat.pem file to NNMi host, then use the same command as adding cucm.gambitcomm.com.pem to the NNMi trust store. Your setup will reach the following state,
 .
.
But you need to wait for the real CUCM's SNMP service to populate CISCO-CCM-MIB objects fully before proceeding. Test whether CCM objects are populated by MimicRec walking the ccmName object, for example
[root@localhost bin]# ./mimicrec --target 10.9.10.76 --root ccmName --nosim. -
Create SNMP Simulation Of Your CUCM
In MimicView , use Simulation->Record Live to create a CUCM device, in our example called sim-10.9.10.76-public .

-
Hybrid SNMP Simulation And Simultaneous WebRec Recording
Configure agent 1 to use the device sim-10.9.10.76-public and IP address 10.9.10.3 , then start the agent 1. To start the simultaneous webrec process, use this example command,
[root@localhost bin]# ./webrec --outfilename cucm-nnmi-phone.log --dest-ip 10.9.10.76 --dest-port 8080 --dest-ssl-port 8443 --servercert ../config/web/cucm.gambitcomm.com.pem --port 8080 --ssl-port 8443 --replace-up 10.9.10.76,10.9.10.3 --replace-down 10.9.10.76,10.9.10.3
, where the replace-up and replace-down substitute client-to-server and server-to-client traffic with simulation agent as the CUCM IP address for NNMi's perspective.To start the recording, goto NNMi IPT wizard, http://10.9.10.66:10080/iptquickstart/wizard in our example,
- Select Cisco in Vendor Name field, 10.9.10.66 in External IP Address field. Click Next.
- Enter StandAloneCluster for Cluster ID field, 10.9.10.3 for Publisher IP Address. Click Next.
The cluster ID is the real CUCM's cluster ID because webrec relays the SOAP response from real CUCM to NNMi, and NNMi checks the SOAP content with this field to see if they are identical. - Enter admin in AXL Username field, and enter the real CUCM's admin password in the Password field. Click Test, then click Next.
The password is the real CUCM's password because webrec hands over the password in HTTP/HTTPS header to the real CUCM - Enter 10.9.10.3 in SNMP Management IP and public in Community String. Click Test then Next.
The community string is the simulated agent 1's community string because the SNMP traffic is simulated by MIMIC agent now - Do NOT enter SSH credentials. Do NOT click Test. Click Next.
- Enter 2 for CDR Polling Interval field, "abc/abc" for CDR File Path field. Do click Test, and do click Next. The test fails because we are not simulating CDR initially.
- Click Summary on the left pane, then click Commit. You should see a green message for success.
Your setup has reached this state, . However, periodic WEB and SNMP pollings, which are needed for successful simulation, have not started yet.
- Go to NNMi main interface, http://10.9.10.66/nnm/ in our example, enter a seed IP address in the
Configuration->Discovery->Seed page. Click "*" to create the new seed and 10.9.10.3 as the seed address, Default Tenant as the Tenant. Then click the floppy disk icon to save.
Periodic WEB and SNMP pollings should be running now. - Check whether the hybrid simulation is working correctly by the Cisco IP Telephony->UCM Cluster page. The hybrid agent should be in the UCM Clusters table. Wait until the Number of IP Phones field has the correct number of phones as the real CUCM. It can take 10 minutes or so for NNMi to add the phones info.
You should have a cucm-nnmi-phone.log file with all the SOAP command traffic now.
-
Post-recording processing
When cucm-nnmi-phone.log has, at least, all the SQL commands as the following table of SQL Variable Column To SNMP Value Space Mapping, stop webrec process by Ctrl-C,
SQL Query Embedded in SOAP Variable Column To SNMP Value Space Mapping select paramvalue from processconfig where paramName=ClusterID paramvalue -> mimic value get ccmClusterId 1 v select c.name as cname,p.name as pname from callmanager
as c,processnode as p where c.fkprocessnode=p.pkidcname -> mimic value get ccmName 1 v
pname -> mimic value get sysName 0 v
select cdrrepmgrhostaddress from cdrmconfig cdrrepmgrhostaddress -> mimic agent get host select name,pkid from processnode name -> mimic value get sysName 0 v
pkid -> 710e28b6-975f-4c8e-883f-c7edb4[set uuid_octet]
, where $uuid_octet is computed with following formula
set server_ip [mimic agent get host]
set lastoctet [lindex [split $server_ip .] end]
set sndlastoctet [lindex [split $server_ip .] end-1]
set host_octet [expr $sndlastoctet * 256 + $lastoctet]
set uuid_octet [format %06d $host_octet]- Convert the recorded log file to MIMIC WEB simulation rule file format with rule mtcl script.
Run the command[root@localhost bin]# ./webconv cucm-nnmi-phone.log, and you will have 2 converted files, rulefile_cucm-nnmi-phone.mtcl and rulefile_cucm-nnmi-phone.rul . - Replace recorded SOAP variable values in the mtcl file with simulation agent SNMP values according to above mapping table using your favorite text editor.
- Name the edited files cucm-nnm.mtcl and cucm-nnmi.rul for our example procedure. And then move the 2 files to mimic-private-area/scripts/web/ directory.
- Convert the recorded log file to MIMIC WEB simulation rule file format with rule mtcl script.
-
Pure simulation
Stop the real CUCM or move it out of NNMi and MIMIC host's reach from the network.
- On MIMIC side, agent 1's device should use the original dev-cucm-r10.0.random of hcs.cfg for our example.
- In MimicView, agent configuration window of agent 1, WEB tab, click Browse for the Rule File field, and select cucm-nnmi.rul.
If you skipped above step 2 through 5, the cucm-nnmi.rul has been packaged in DEVHCS library pack, and the cucm-nnmi.rul file will be in blue indicating that it is part of mimic shared installation area. - Start all agents. Agent 1 should bind TCP port 8443 successfully.
- Goto NNMi IPT wizard, http://10.9.10.66:10080/iptquickstart/wizard in our example,
- Select Cisco in Vendor Name field, 10.9.10.66 in External IP Address field. Click Next.
- Enter CUCM-CLS-00001 for Cluster ID field, 192.168.1.21 for Publisher IP Address. Click Next.
The cluster ID is the simulated CUCM's cluster ID, not the real CUCM's. - Enter admin in AXL Username field, and enter arbitrary password in the Password field. Click Test, then click Next.
The password is not verified by simulated CUCM. So it can be arbitrary. - Enter 192.168.1.21 in SNMP Management IP and public in Community String. Click Test then Next.
The community string is the simulated agent 1's community string. - Do NOT enter SSH credentials. Do NOT click Test. Click Next.
- Enter 2 for CDR Polling Interval field, "abc/abc" for CDR File Path field. Do click Test, and do click Next. The test fails because we are not simulating CDR initially.
- Click Summary on the left pane, then click Commit. You should see a green message for success. Your setup has reached this state,
- Go to NNMi main interface, http://10.9.10.66/nnm/ in our example, enter a seed IP address in the
Configuration->Discovery->Seed page by clickng "*" to create the new seed and 192.168.1.21 as the seed address, Default Tenant as the Tenant. Then click the floppy disk icon to save.
Periodic WEB and SNMP pollings should be running now. - Check whether the simulation is working correctly by the Cisco IP Telephony->UCM Cluster page. The hybrid agent should be in the UCM Clusters table. It can take a few minutes for NNMi to add the Cluster entry. There are no IP phones at this point in the cluster if you use the pre-packaged cucm-nnmi.rul .
 , however seeding needs to be configured as well for the pure simulated agent.
-
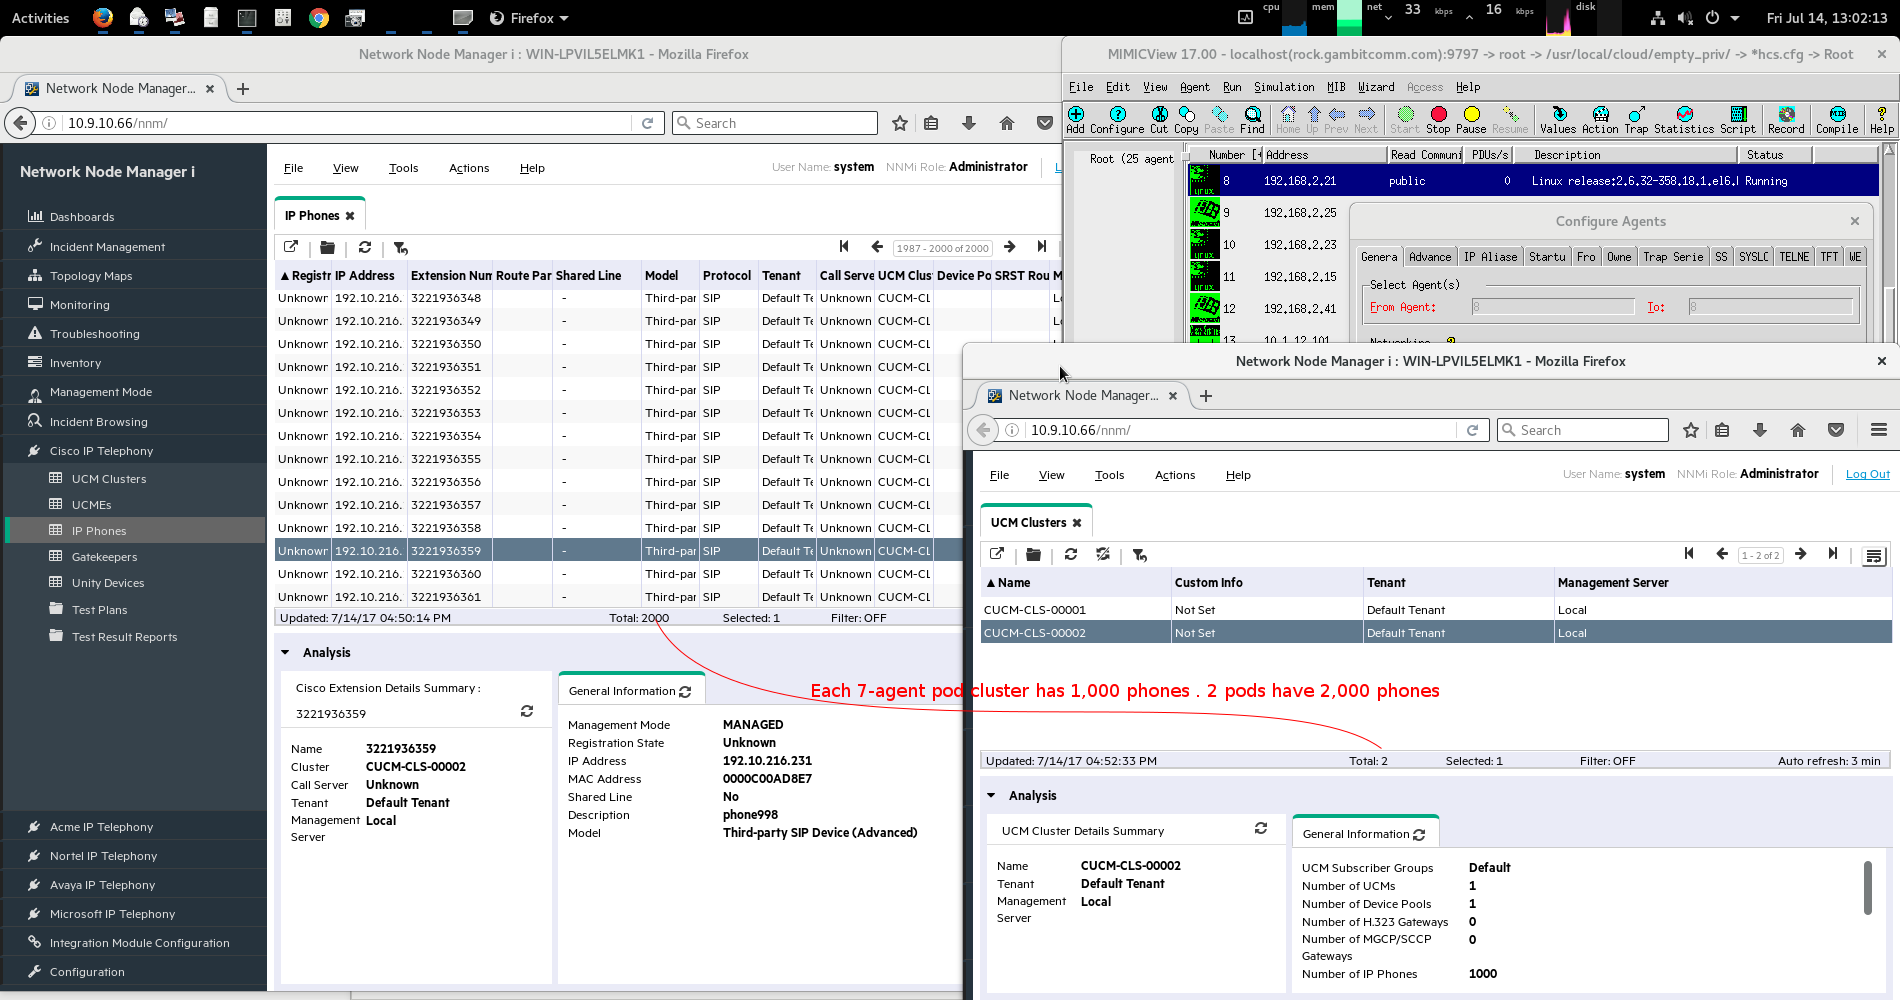
Adding Large Number Of Phones And Duplicating Cluster Pods
- Stop all agents before initializing Mimic Virtual Lab Pod
- Initialize the first cluster pod with the following command
[root@localhost bin]# ./mimicsh --nogui --script ../scripts/pod_initialize.mtcl --args {1-7} - Duplicate pods with the following command
[root@localhost bin]# ./mimicsh --nogui --script ../scripts/pod_duplicate.mtcl --args 2
To avoid create more agents than MIMIC license allows, here we create a small number of duplicates. - Start all agents. For each pod of 7 agents, to add phones, run the following command examples
./mimicsh --nogui --script ../scripts/web_add_phones.mtcl --agent 1 --args {1000 192.9.213.1}
./mimicsh --nogui --script ../scripts/web_add_phones.mtcl --agent 8 --args {1000 192.10.213.1}
 .
.
-